釋出/訂閱 MQTT 訊息
概述
MQTT 是一種輕量級、開放和簡單的訂閱者/釋出者訊息傳輸協議,被認為是在需要小程式碼佔用空間和/或網路頻寬稀缺的應用程式中的一個很好的解決方案。它特別適用於連續監測諸如溫度、壓力、水位、能源監測等感測器資料。
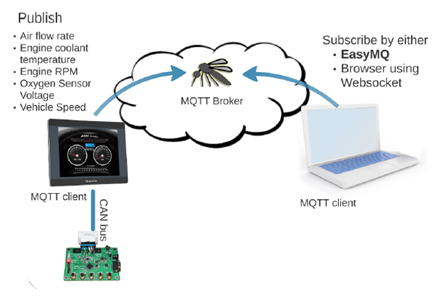
釋出者、訂閱者和代理是 MQTT 協議中的三個重要角色。如下圖所示,當釋出者向代理釋出訊息時,代理將將訊息傳遞給訂閱者。
Weintek HMI 和 MQTT
HMI 從 PLC 處理資料並將訊息釋出到 MQTT 代理,代理將處理訊息傳遞給訂閱者。透過這種方式,即使 HMI 位於防火牆後且難以訪問 HMI,也可以進行訊息釋出。
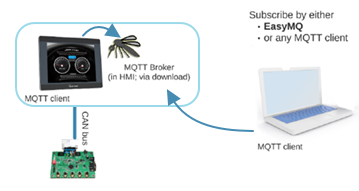
另外,MQTT 訊息可以內部發布到內建的 MQTT 代理。也就是說,不需要外部代理;可以使用 MQTT 客戶端直接訂閱 HMI 內部的 MQTT 代理並接收訊息更新!只要 MQTT 客戶端可以直接連線到 HMI,例如透過 VPN 或 EasyAccess 2.0,就可以實現這種方案。
EasyBuilder Pro 設定
在 EasyBuilder Pro 中,點選 [物件] » [MQTT] 來設定專案中的 MQTT。
伺服器設定
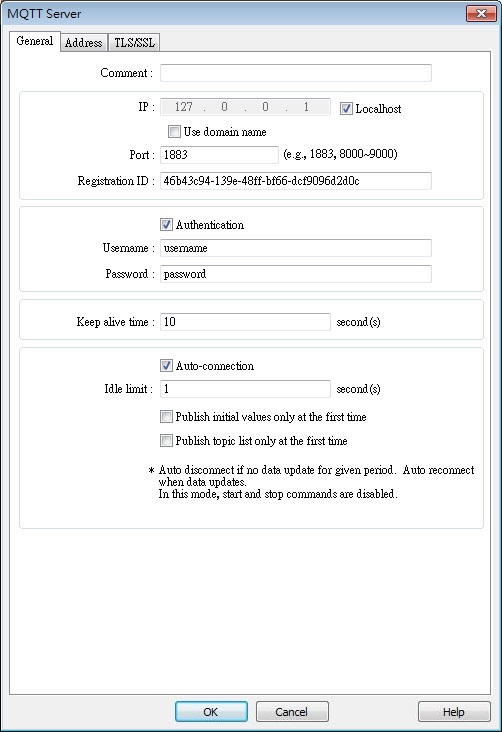
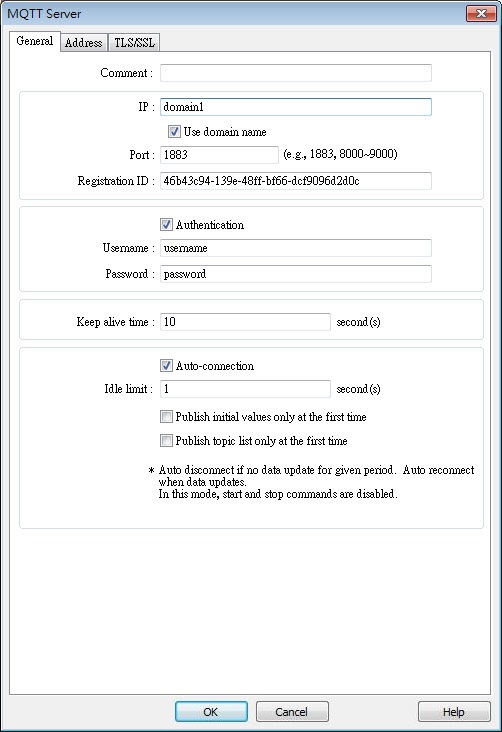
首先,必須輸入 MQTT 伺服器資訊。伺服器的 IP 地址或域名是代理的 IP 地址或域名。當使用本地地址(127.0.0.1)時,訊息將被髮布到 HMI 中的內建代理。要透過域名指定代理,請選擇 [使用域名],然後在 IP 欄位中輸入域名。為了防止未經授權的訂閱者連線到伺服器,請選擇 [身份驗證] 覈取方塊。選擇此覈取方塊後,連線 MQTT 伺服器將需要使用者名稱和密碼。在 [自動連線] 模式下,如果在指定的時間段內沒有資料更新,連線將自動斷開。主題列表顯示當前 HMI 上可以訂閱的主題。為了避免每次連線伺服器時都發布主題列表,請選擇 [僅在第一次釋出主題列表]。
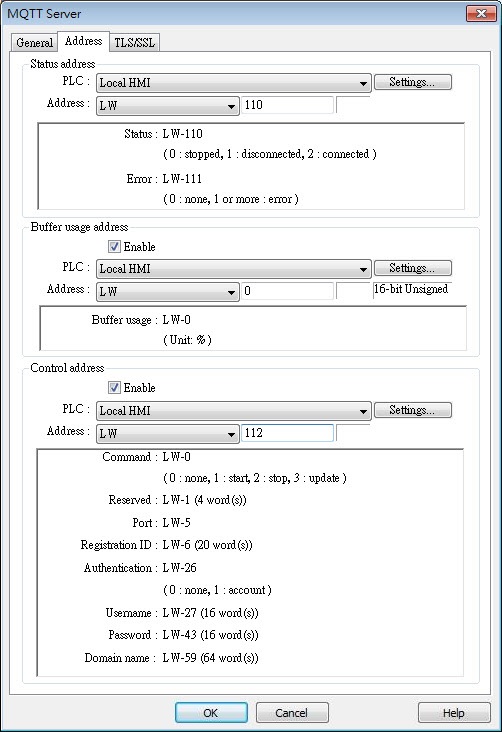
可以指定 LW 地址以在 HMI 執行時動態控制 MQTT 或顯示 MQTT 狀態。在指定地址後,其相對地址(+1、+2、+3 等)將對應不同的屬性或引數,如下圖所示的 EasyBuilder Pro 設定對話方塊。例如,如果將 MQTT_STATUS 設定為 LW-110,則 LW-110 顯示狀態,LW-111 顯示錯誤程式碼。
未傳送的訊息儲存在緩衝區中。緩衝區的最大容量為 10000 條訊息。當緩衝區已滿時,將刪除最早的訊息。
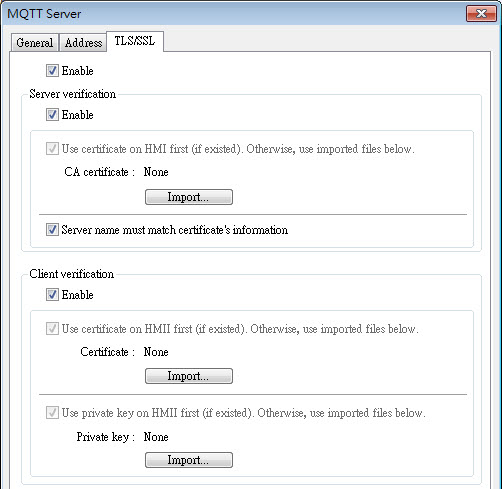
啟用 TLS/SSL 認證會開啟兩種驗證方法:
- [伺服器驗證]:驗證伺服器證書是否由 CA(證書頒發機構)證書籤名。
- [客戶端驗證]:透過提供私鑰和證書,伺服器可以更快地驗證客戶端,跳過使用者名稱或密碼登入。
預設訊息
當 HMI 是釋出者並且首次連線到代理時,將從 HMI 傳送兩個預設主題,以 QoS2 釋出。
iot-2/type/mt/id/[client id]/evt/topics_update/fmt/json此主題包含從 HMI 傳送的訊息,並顯示訊息是否已壓縮。iot-2/type/mt/id/[client id]/evt/status/fmt/json此主題顯示 HMI 和代理之間的連線狀態。
主題釋出者設定
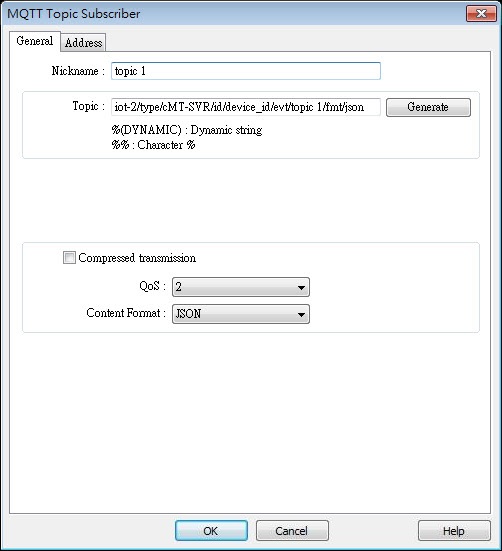
設定 MQTT 伺服器後,開啟 MQTT 主題設定。每個主題包含要傳送的多條訊息。
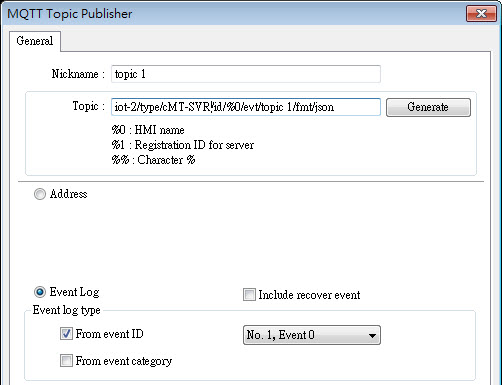
主題的名稱可以由使用者定義,並且可以在主題名稱中使用字元 % 後跟特定程式碼來使用 HMI 名稱/伺服器設定。
例如:iot-2/type/cMT-SVR/id/%0/evt/topic 1/fmt/json
%0 代表 HMI 名稱。要查詢 HMI 名稱,請在 HMI 上開啟系統設定,或使用系統暫存器 LW-10884。如果 HMI 名稱為“Default HMI”,則主題應寫為:iot-2/type/cMT-SVR/id/Default HMI/evt/topic 1/fmt/json
傳送模式:如果選擇基於觸發的模式,則 MQTT 訊息在主題中的任何值更改時傳送。如果選擇基於時間的模式,則資料將按固定時間間隔釋出。
除了地址傳送模式外,當建立事件日誌時,在 MQTT 主題釋出者設定對話方塊中可以找到 [事件日誌] 選項。
當傳送模式為 [地址] 時,在地址選項卡中,設定將包含在主題中的資料組合。地址可以是連續的或非連續的,可以是不同的資料型別和長度。
MQTT 提供三個可靠性級別,稱為服務質量(QoS)。訊息的可靠性決定了訊息的永續性。
- 0:至多一次,訊息不持久。
- 1:至少一次。
- 2:僅一次。
有關 QoS 的更多資訊,請點選此處。
[壓縮傳輸]:在傳送之前將訊息壓縮,讀取訊息之前需要解壓縮。MQTT 中的訊息使用 DEFLATE 演算法進行壓縮/解壓縮。
[內容格式]:支援的格式有:JSON 和原始資料。

下面是一個顯示 JSON 和原始資料之間差異的示例。
當在以下地址格式中釋出四個值時:
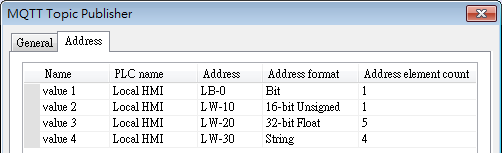
JSON:
{
  "d" : {
    "value 1" : [ false ],
    "value 2" : [ 2 ],
    "value 3" : [ 1.20000005, 0, 0, 0, 0 ],
    "value 4" : [ "ABCD" ]
  },
  "ts" : "2017-04-18T17:36:52.501856"
}
原始資料:
0002 009A 9999 3F00 0000 0000 0000 0000
0000 0000 0000 0041 4243 4400 0000 00
訂閱者設定
您可以從其他 MQTT 伺服器訂閱主題。設定與前面章節中演示的釋出者設定類似。不支援訂閱事件日誌。
內容格式可以是 JSON 或原始資料,請選擇釋出者支援的格式。
JSON:
{
  "d" : {
    "value 1" : [ false ],
  },
  "ts" : "2017-04-18T17:36:52.501856"
}
請注意,“ts”(時間戳)應按升序排列。
原始資料:
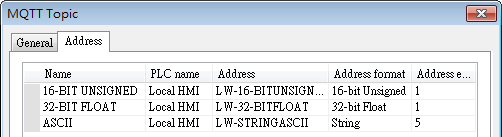
根據訂閱的主題指定地址格式。
例如,如果主題包含以下地址格式:位、16 位無符號、字串(長度為 4)。地址設定應為:
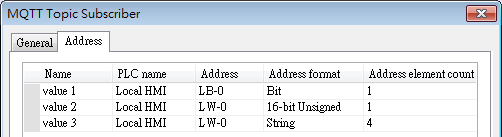
在此示例中,從值 1 到 3 的順序應為:位、16 位無符號、字串。
順序不能更改,地址元素計數應相同。
專案和應用程式
在上述 MQTT 伺服器設定中可以找到兩種型別的地址:MQTT_COMMAND(控制地址)和 MQTT_STATUS(狀態地址)
控制地址可以指定為設定控制引數的地址,相應的地址包括 MQTT_COMMAND+1 ~ MQTT_COMMAND+43 等。狀態地址可以顯示連線狀態,相應的地址包括 MQTT_STATUS 和 MQTT_STATUS+1。
地址的資訊可以在 EasyBuilder Pro 設定對話方塊中找到。
在 HMI 執行時:
- 將 MQTT_COMMAND 設定為 1 可以將 HMI 與代理連線。
- 將 MQTT_COMMAND 設定為 2 可以將 HMI 與代理斷開連線。
- 在更新控制引數後,將 MQTT_COMMAND 設定為 3 可以使用新引數將 HMI 與代理連線。
可以使用上述控制地址在 HMI 執行時動態更改 MQTT 設定。
選擇代理
使用 HMI 中的內建代理
要使用 HMI 中的內建代理,請在 MQTT 伺服器設定對話方塊中選擇 Localhost 覈取方塊(預設 IP 地址:127.0.0.1),或者在 HMI 上將 IP 地址設定為 127.0.0.1。MQTT 將使用 HMI 中的內建代理,客戶端程式可以使用 HMI 的 IP 地址連線到代理。
HMI 的 MQTT 代理應從 EasyBuilder Pro 下載到 HMI。請在下載 MQTT 代理時選擇 [執行時]。
使用外部代理
要使用外部代理,請在配置 MQTT 伺服器資訊時輸入外部代理的 IP 地址。
例如,當使用公共代理 HiveMQ 時,代理的資料為:
主機:broker.hivemq.com(212.72.74.21)
埠:1883
Websocket 埠:8000
(http://www.hivemq.com/try-out/)
從 EasyBuilder Pro V5.07.01 開始,支援域名。請在代理的實際 IP 地址或域名(broker.hivemq.com)中輸入。
使用自建代理
使用者可以託管 MQTT 代理伺服器。以下是一些經過驗證的選擇:
- Mosquitto (http://mosquitto.org/download/)
- HiveMQ (http://www.hivemq.com/downloads/)(提供測試版本)
- EMQ (http://emqtt.io/)
請訪問它們各自的官方網站以獲取安裝和限制的詳細資訊。
獲取 MQTT 資料
獲取 MQTT 資料更新需要一個 MQTT 客戶端程式。客戶端程式連線到代理並註冊以接收來自 HMI 的資料更新。在網上可以找到許多免費的客戶端程式。本章介紹一個用於 PC 的免費程式:MQTT.fx。
MQTT 客戶端程式
在網上可以找到許多免費的 PC 和行動式 MQTT 客戶端程式。以下簡要介紹如何使用 PC 上的 MQTT.fx 連線到代理以獲取來自 HMI 的訊息更新的步驟。對於其他程式,配置步驟可能類似。
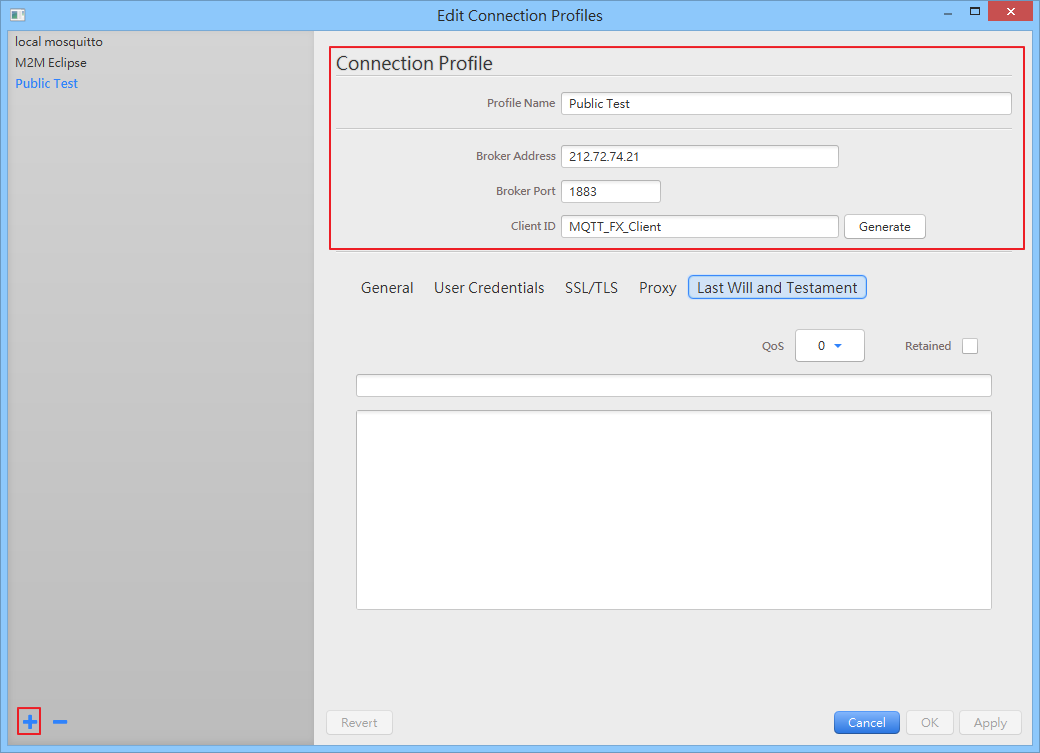
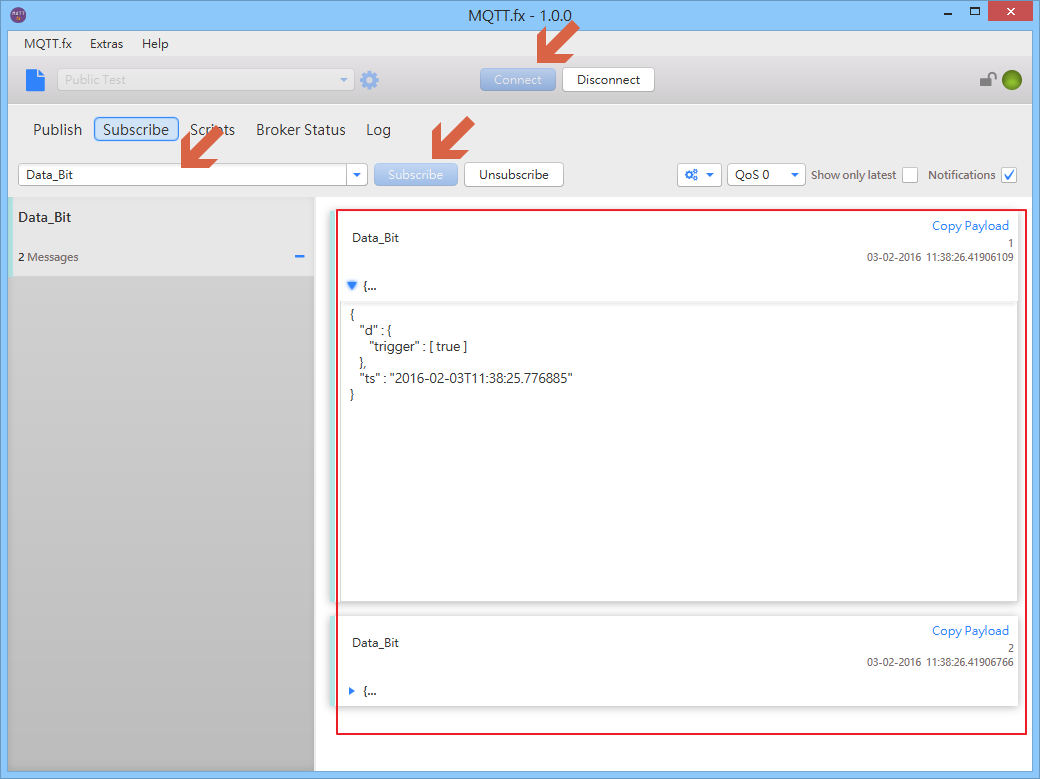
假設 HMI 正在執行 MQTT 演示專案。它已配置為連線到 212.72.74.21/埠 1883 的 MQTT 伺服器。它有一個名為 Data_Bit 的 MQTT 主題。
在 MQTT.fx » 編輯連線配置檔案視窗中,連線配置檔案應設定如下。
代理地址:212.72.74.21 代理埠:1883 配置檔名稱:使用者定義 客戶端 ID:使用者定義
其餘設定可以保持預設值。點選 [連線] 後,將與代理建立連線。
開啟訂閱選項卡 » 在下面的欄位中輸入 Data_Bit » 點選 [訂閱] 按鈕。成功訂閱後,當有 MQTT 訊息更新時,它們將被接收並顯示在主螢幕上。
參考資料
- 七個最佳 MQTT 客戶端工具
http://www.hivemq.com/blog/seven-best-mqtt-client-tools