Push Notification via Webhook
You can configure custom webhooks to receive push notifications from your HMIs. This allows you to:
- Integrate push notifications with your own systems or applications
- Use your own LINE Official Account or Telegram Bot
- Integrate with enterprise notification systems or custom applications
- Transform push notifications into event triggers for other automation workflows
Requirements:
- HMI with EasyAccess 2.0 activated
- Push notification (EasyAccess 2.0) enabled in EasyBuilder Pro
- A webhook endpoint (HTTPS recommended)
- Domain admin privileges to configure webhooks
Setting Up a Webhook in Weincloud
Creating a Webhook
- Log in to Weincloud through social login (refer to Social Login for details)
- From the left sidebar, select Notifications to enter the "Social Settings/Notifications" page
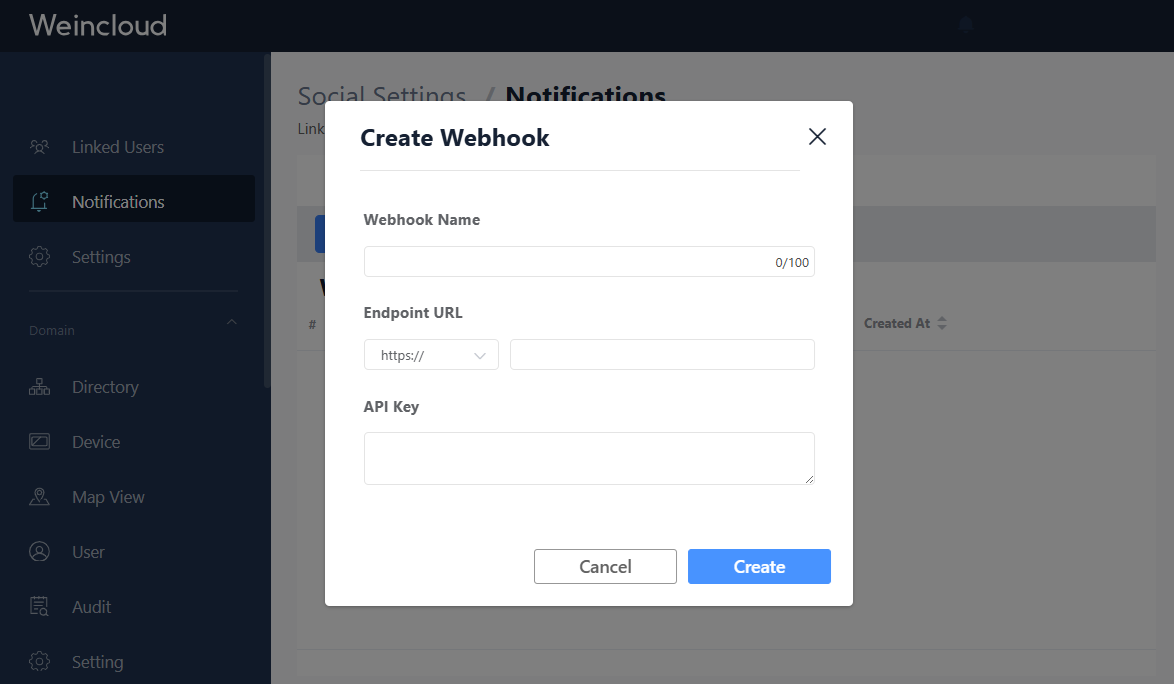
- Click Create Webhook
- Fill in the webhook configuration:
- Name: A descriptive name for your webhook
- Endpoint URL: The URL where webhook requests will be sent (e.g.,
https://your-server.com/webhook) - API Key: (Optional but recommended) A secret key for authentication
Associating HMIs with Webhook
After creating a webhook, you need to associate it with specific HMIs:
- Select the webhook you created (the right panel will show the Information tab by default)
- Switch to the HMIs tab
- Click Add to select HMIs
- Choose the HMIs that should send push notifications to this webhook
- Click Save
Testing Your Webhook
You can test your webhook configuration before deploying:
- Select your configured webhook
- Click the Test button
- Weincloud will send a test payload to your endpoint
- Check the response status and verify your endpoint receives the request correctly
Webhook Request Format
When an event occurs on an associated HMI, Weincloud will send an HTTP POST request to your configured webhook URL.
HTTP Headers
X-API-KEY: <your api key>
Content-Type: application/json
Note: You can verify the
X-API-KEYheader in your server to ensure it matches the configured API key for authentication.
Payload Structure
{
  "hwkey": "<hardware key>",
  "message": {
    "de": "Online",
    "en-US": "Online",
    "es-ES": "En linea",
    "fr-FR": "En ligne",
    "it": "Online",
    "ja": "オンライン",
    "ko": "온라인",
    "pl": "Online",
    "ru": "Онлайн",
    "zh-CN": "在线",
    "zh-TW": "連線"
  },
  "hmiName": "<device name>",
  "hmiTime": "2025-01-01 00:00:00",
  "serverTime": "2025-01-01 00:00:00",
  "eventType": "event-online-offline"
}
Note: The language keys in the
messageobject may differ from this example. The actual languages depend on your HMI project settings in EasyBuilder Pro.
Field Descriptions
| Field | Type | Description |
|---|---|---|
hwkey | string | Unique hardware key of the HMI device |
hmiName | string | Display name of the HMI (nickname if set, otherwise device name) |
message | object | Event message in multiple languages (key-value pairs) |
hmiTime | string | Timestamp when the event occurred on the HMI (format: YYYY-MM-DD HH:MM:SS). Timezone follows the HMI's configuration. |
serverTime | string | Timestamp when the event reached the server (format: YYYY-MM-DD HH:MM:SS). Timezone depends on server region: UTC+0 for production region, UTC+8 for China region. |
eventType | string | Type of event that triggered the notification (see below) |
Event Types
| Event Type | Description |
|---|---|
event-trigger | Trigger event - an alarm or condition was triggered |
event-recover | Recover event - a previously triggered alarm has recovered |
event-online-offline | HMI online/offline event |
Implementation Examples
Below are implementation examples for popular serverless platforms. These examples demonstrate how to receive webhook requests, validate authentication, and forward notifications to messaging platforms.
AWS Lambda
AWS Lambda is a serverless computing service that runs your code in response to HTTP requests without managing servers.
Setup Steps (AWS Lambda)
Create a Lambda Function
- Go to AWS Lambda Console
- Click Create function
- Choose Author from scratch
- Enter a function name
- Select Python 3.13 runtime
- Create the function
Configure Environment Variables
- Go to Configuration → Environment variables
- Add the required variables (see Environment Variables below)
- Click Save
Deploy the Code
- Download one of the example files from Example Code Downloads below
- Copy the code into the Lambda function editor
- Click Deploy
Create Function URL
- Go to Configuration → Function URL
- Click Create function URL
- Auth type: NONE (You can implement your own authentication using API key)
- Click Save
- Copy the generated URL
Configure in Weincloud
- Use the Lambda Function URL as your webhook endpoint
- Set the API key to match the
EXPECTED_API_KEYenvironment variable - Click Test in Weincloud to verify the setup
Cloudflare Workers
Cloudflare Workers is a serverless platform that runs your code on Cloudflare's global edge network.
Setup Steps (Cloudflare Workers)
Create a Worker
- Log in to Cloudflare Dashboard
- Navigate to Workers & Pages
- Click Create application
- Click Start with Hello World!
- Give your worker a name
- Click Deploy
Deploy the Code
- Download one of the example files from Example Code Downloads below
- Click Edit code in your worker
- Replace the default code with the example code
- Click Deploy
Configure Environment Variables
- Go to Settings → Variables
- Add the required variables (see Environment Variables below)
- Click Save
Get Worker URL
- Copy your worker's URL (e.g.,
https://your-worker.your-subdomain.workers.dev) - Use this URL as your webhook endpoint in Weincloud
- Click Test in Weincloud to verify the setup
- Copy your worker's URL (e.g.,
Example Code Downloads
Below are the complete example code files for implementing webhook endpoints on different platforms. These examples demonstrate how to receive webhook requests from Weincloud, validate API keys, parse payloads, and forward messages to LINE or Telegram.
AWS Lambda Examples
📥 Download aws_lambda_line.py (Python - LINE)
📥 Download aws_lambda_telegram.py (Python - Telegram)
Cloudflare Workers Examples
📥 Download cloudflare_worker_line.js (JavaScript - LINE)
📥 Download cloudflare_worker_telegram.js (JavaScript - Telegram)
What these examples include:
- API key authentication validation
- Webhook payload parsing and validation
- Message forwarding to LINE Messaging API or Telegram Bot API
- Environment variable configuration
Environment Variables
All example code requires the following environment variables to be configured in your serverless platform (AWS Lambda or Cloudflare Workers):
For LINE Integration
| Variable | Description | How to Obtain |
|---|---|---|
EXPECTED_API_KEY | API key for webhook authentication | Set this to match the API key configured in Weincloud |
LINE_CHANNEL_ACCESS_TOKEN | LINE Messaging API channel access token | LINE Developers Console → Create/Select Channel → Channel settings |
LINE_USER_ID | LINE user ID or group ID to send messages to | Personal chat: Get from your LINE profile or use LINE Bot to collect user IDs Group chat: Add your LINE Bot to the group, then check the LINE webhook logs or use the LINE Bot SDK to get the group ID |
External Resources:
For Telegram Integration
| Variable | Description | How to Obtain |
|---|---|---|
EXPECTED_API_KEY | API key for webhook authentication | Set this to match the API key configured in Weincloud |
TELEGRAM_BOT_TOKEN | Telegram bot token | Create a bot using @BotFather |
TELEGRAM_CHAT_ID | Chat ID to send messages to | Personal chat: Get your chat ID using bots like @userinfobot Group chat: Add your bot to the group, send a message, then visit https://api.telegram.org/bot<YOUR_BOT_TOKEN>/getUpdates to find the group chat ID (negative number) |
External Resources:
Configuration Notes:
- For AWS Lambda: Add environment variables in Configuration → Environment variables
- For Cloudflare Workers: Add variables in Settings → Variables
- The
EXPECTED_API_KEYmust match the API key you configured in Weincloud webhook settings - Keep all credentials and keys secure to prevent unauthorized access